Showing posts with label thrifting. Show all posts

Tuesday, April 17, 2012

New House Guest

Yesterday while searching at the thrift store I spotted five little men I just HAD to bring home. . . .


I cannot WAIT to paint these! They are is great shape just need repainted with DETAIL! Yipee, I am sooooo excited to put these in the gardens. They only cost $1.99 a piece too. Good deal compared to finished gnomes selling for around $20.


Tuesday, March 20, 2012

Thrift Store Revamp: Timeout Bench

Not sure who made up with the saying Terrible Two's, but apparently they hadn't reached the Three's yet, because I tell ya, they are soooo much worse!! I am thinking the phrase should be reconsidered and reclaimed as "Terrible Toddler's". Much more fitting, don't 'cha think?

As you can probably tell above, Ms. Bumble Bee's got a attitude and is a little trouble maker! So when I found this absolutely adorable timeout bench at the thrift store over the weekend, I had to grab it. Exactly what she needs, a spot all her own when in time out. 

 
I couldn't leave it how it was though. Someone had doodled all over it, and the left front corner looked chewed on. I bet by a Terrible Toddler.  

After sanding, three layers of spray paint, first white, next black, then creme, and more sanding, I am pleased with the final result.


Okay, so I went a little overboard on the aging effect.  But it's my favorite part of revamping. I love sanding layers off, exposing different colors underneath. I love love love the yellow, blue, and red just barely peeking out beneath the other paint layers on the letters. Now it has so much character!

Of course, I have to share a picture of the timeout bench in action.


Sassy like mom probably wasn't the right shirt for this photo opportunity, but I had to capture that lip.


Friday, March 9, 2012

Dining Room Art

There has been a large, blank spot on the wall,  in my dinning room area for a few months now. I needed to fill it in quick for my sanity. What do I want to hang there though?? 

A week ago or so, I decided this had to be dealt with.......NOW.

 I searched the web and other blogs but found nothing. I bought  a few decor magazines and still came up empty handed. I looked through my Pinterest and still not a thing was catching my eye. . I was completely stumped.

 Until I remembered prior to finding Pinterest, I would save pictures of decor ideas to multiple folders on my desktop. In the dining room folder, I found a couple pictures of  plates hanging on the wall. I  fell in love all over again. 

 I did NOT want to go out and purchase expensive matching decoration plates. I hit up my local thrift store and figured out to look only for shape and detail in a plate, and not judge it on its color.

I found seven completely different plates that I loved. I also stopped by the local hardware store and picked up two bottles of Rust-oleum's Painters Touch Ultra Coverage in gloss white.

These are the plates i found, in all their prepainted glory. (I later replaced the sharp angled one on the right side with a much cuter one with a doily look)


So as you can see, these plates would look hideous on the wall grouped together. But after two coats of white spray paint they look FABULOUS!


The trick to hanging the plates are DiskHangers. I forgot to take a picture of how the disk hangers work. This is a picture from their website.

It was so easy to hang the plates with these. Well worth the cost, which isn't bad.

Hope you all have a great weekend.

Wednesday, February 22, 2012

DIY Dress-up Wardrobe

Remember last week when I revamped a craigslist dresser for my daughters room? I mentioned her old dresser had lived a long, happy life and was ready to go. But as my husband brought it out of her room, I started to think how sturdy it was. Really, only the drawers and tracks were in bad shape.

 As you may know, I hate throwing anything away until I have thought of all possible uses or projects. 
I came up with the perfect project, a dress-up wardrobe for B's room. This is the dresser before the makeover.


And the After


Bumble Bee loves it. Before I had all her costumes (as you can see she has a lot) hanging in her closet, which was just too high. I plan on mounting a couple hooks on the side to hang jewelry on. 

This project was super easy and it only cost $14 out of pocket. We already had the dresser on hand plus the purple paint, and the batting. I had to purchase the closet bar and brackets. They were $6 together. The fabric for the sides ( a twin sheet from the thrift store) was only a whopping $2 and the ric rac ribbon was $6.

The ric rac ribbon was OUTRAGEOUSLY expensive. I needed to buy two spools at $6.99 each!!! Good thing I had coupons :)

After pulling out all the drawers, my amazing husband cut off the support wood for the drawers. This was way easy and I could have done it, but he likes to help. Next I sanded and sanded some more. I wanted to get the inside and out, as smooth as possible.

Once I was content with it's smoothness, I stapled batting to the sides and top. The fabric or sheet I picked up, had ballerina tutu's and slippers on it, plus a ugly barbie head. I cut up the sheet to fit the sides, top and bottom to show as least of the heads as possible and stapled it on top of the batting. 

I was more precise when stapling the fabric on. I only stapled around the edges, that way I could cover the staples with ribbon. When hot gluing the ribbon on, I  added a dot of glue to every staple to insure perfect coverage.

Don't look to closely at the shoes in the bottom of the wardrobe, I don't think she has one match under there in the picture LOL

Thursday, February 16, 2012

In need of Rescuing

Me? Oh no. . .


Okay, well maybe. . .


Okay, okay already. YES I am drowning!!! 

Between mid-terms, Brooke's ballet, Tanner's basketball, my zumba, Travis going back to work (yay!), trying to start a incredibly awesome blog and business, tax season, watching two sets of twins, (pause, calm down, deep breath, where's a paper bag?)

 I am a bit overwhelmed. 

One of my favorite stress relievers though, is SHOPPING. I know, not a big shock, all women, at least once in a while, engage in retail therapy. But my version is a tad different, I thrift! When I am feeling down, a thrift store and $20, cheer me right up. Then I usually go home and craft, my second favorite calming treatment. 

So a few days ago, feeling nothing less than crazy, I shared my secrets with my favorite second hand store. There I found something else in need of rescuing,
 old jewelry boxes. 

There was so many of them on the shelf. They were all for just pennies, too. I just had to renovate a couple. . . or ten, plus a few other wood items. Hey, I didn't use my entire $20. Plus I had a 25% off entire purchase coupon.

Once at home I had to face reality again.  I cleaned the house, made a large after school snack for 6 kiddos, did some homework and then cooked dinner for the fam.

But later that night, when all were asleep, I crafted away! 

 This  is my favorite box I picked up. It was in great condition on the outside, but horrid on the inside. It is actually a music box. It plays Elvis' Teddy Bear or to me Full House's Teddy Bear song.  The music mechanism is in pristine condition too. 

Before:


After:


This little lady had a southern belle attitude just dying to come out.


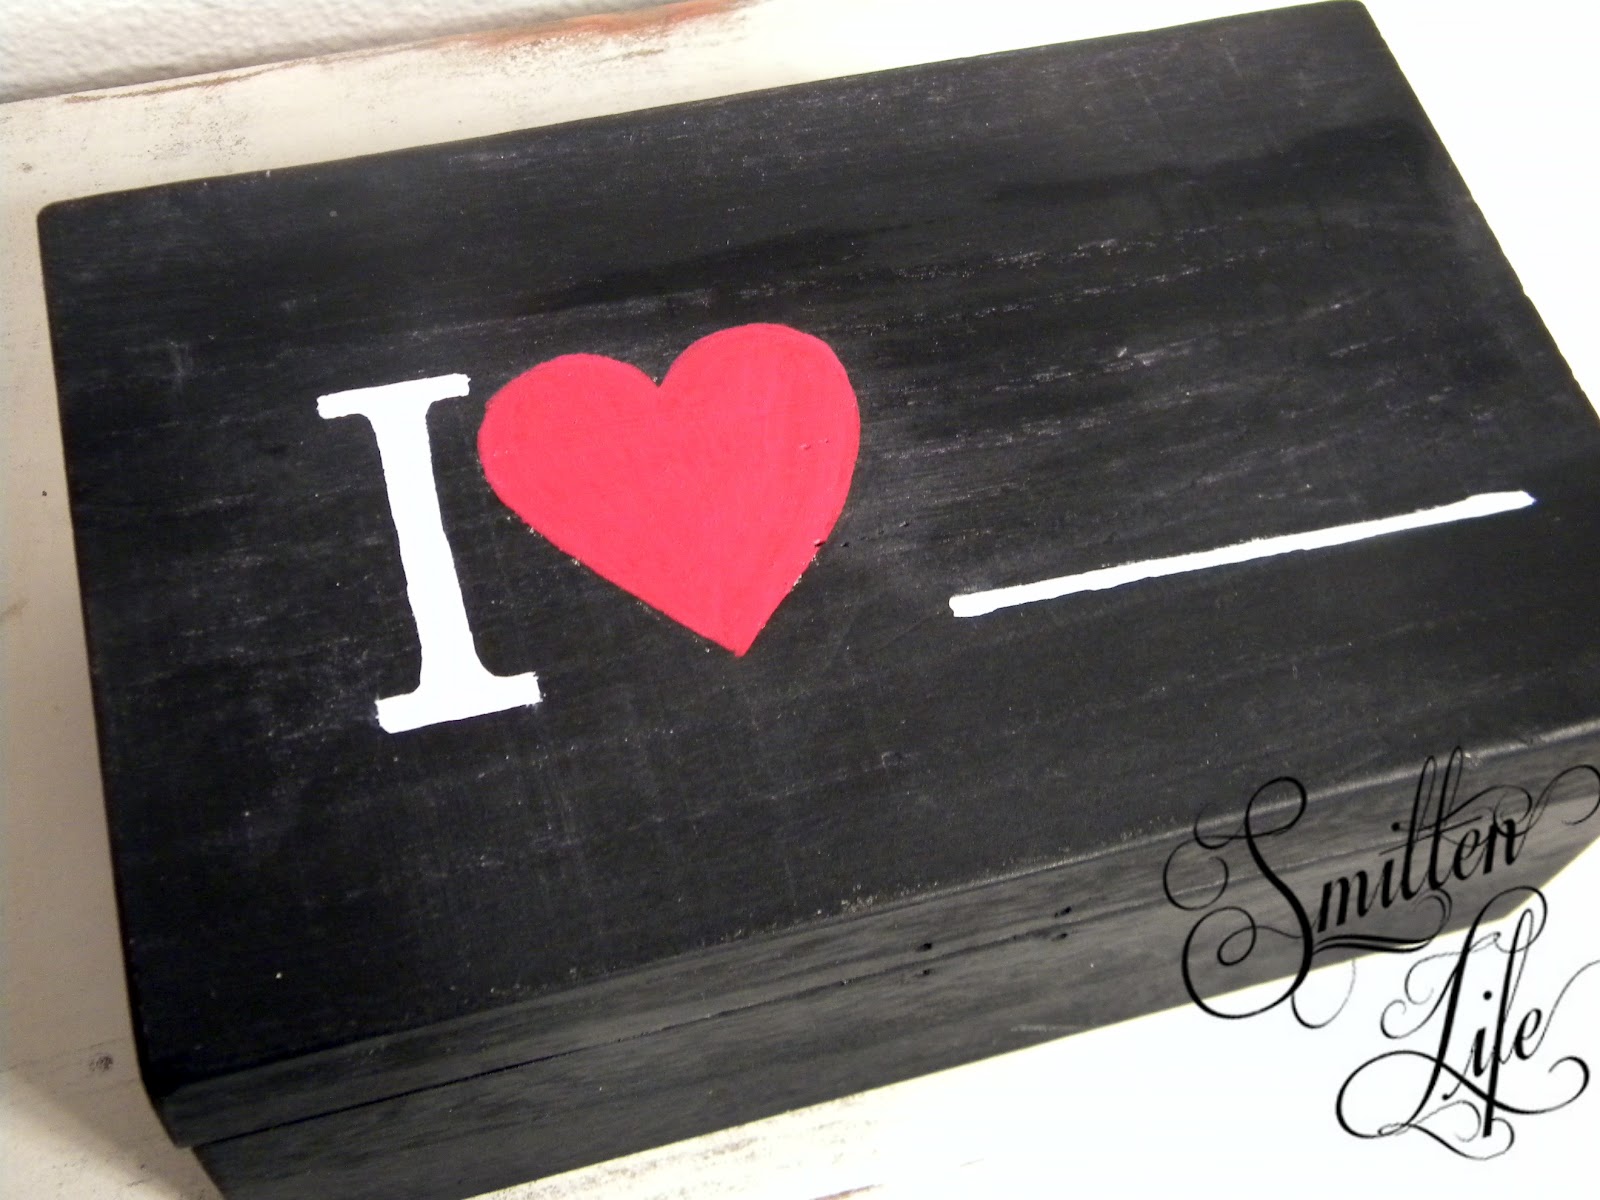
This simple box was 10 cents, so of course, I couldn't pass it up, but I had a hard time figuring out what to do with it. Not my favorite, but it has a fun chalkboard finish. 

It can heart whatever your heart desires.


And lastly, for now, a cute plate. I just love silhouettes. I am not sure why the picture looks so weird around the flower. . . hmm. I hand painted a charming little girl silhouette with a flower in her hair 'cause I could :)


Now, I have to find a spot in my craft room for about eight more boxes.

Hope everyone is having a great day! And if not. . .  THRIFT! It works wonders, plus it doesn't break the bank like Macy's :)